• Please be sure to read the rules and adhere to them. Some banned members have complained that they are not spammers. But they spammed us. Some even tried to redirect our members to other forums. Duh. Be smart. Read the rules and adhere to them and we will all get along just fine. Cheers. :beer: Link to the rules: https://www.forumsforums.com/threads/forum-rules-info.2974/

Astro van cat conversion

KickerM

Active member
Site Supporter
GOLD Site Supporter
I enjoy the journey more than the destination! I always have enjoyed the process more than the end result...either way keep up the good work! And to answer your question my Mill is a Bridgeport 9x32” and my Lathe is a Seneca Falls 36” (I believe). The neat part is that the guys dad that I bought them from made parts for NASA on these two machines for the Gemini Space Project!!! So they may be old (1915 on the Lathe) but if they were good enough for NASA it should be good enuf for a snowcat...lol
2b175239eb0df87829957d94243ae8b5.jpg

efc92e65fe24bef9247e8759c1c6c95a.jpg
 

olympicorange

Active member
……. that appears to be the ''K'' frame ...4wd style ,... from the 80's era ,... I keep a few of those around myself,.... :thumbup:
 

Snowy Rivers

Well-known member
Kicker

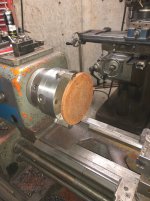
You can do a lot of work on those two machines....
Tooling is the part that cost the Bucko's

I picked up a lot of my tooling off ebay.
Many would turn their nose up at some of my tooling because it was made overseas....fact is the stuff is not bad at all.

Not sure it would hold up in a production shop.... but for a hobby application its fine.

Carbide cutters are expensive.....but again, watching ebay can net some good finds of Aerospace contract over stock items very very inexpensive....

I see you have a 4 jaw chuck :clap:
These are so handy for getting hold of odd shaped items and being able to dial in an existing bore to do whatever is needed..

Also...grabbing a square or rectangle chunk of material and working on it..

The younger crowd will scoff at anything less than a CNC to machine parts.....but this country was built with machines far more crude than the manual ones you and I have.....

If the spindle is tight on the lathe as well as the ways being fairly snug and the cross feed...if you can hold tolerance to .002" you can do most stuff you will need for what we do..

Now if you need to get down into the .0005" range we are talking a different story.

If you are careful and you can finesse things a bit you can gitterdone..


Thanks for sharing the pix....:smile:

Olympic

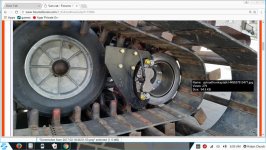
Yes exactly 1987 K Burb

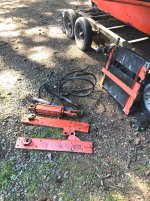
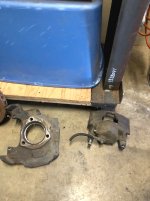
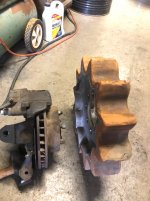
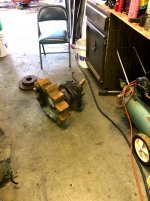
I dragged that mount out mostly to see if there was any good reason to go barking up the tree about stuffing a 454 in the Cat.

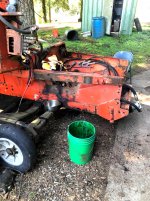
I am not really excited about that cross member as it takes up a lot of space...

See the piccy of the motor mount for SB/BB Chevy....a good maybe.

This set up is far simpler and will keep the belly access open to allow working on things....Like the starter...

I don't want clutter.....

There is going to be plenty of that anyway.

The Chevy V8 will sit such that access down through the DOGHOUSE in the van should make things like the distributor an easy reach....

I simply do not know yet where this will all wind up.

A radiator capable of cooling the big Rat is my biggest worry....

The 2100 front end is only 28 inches wide.....just not enough room down there for a big core.

It may be an idea to do a larger than stock radiator up in the Van location... and add a couple big electric fans..

Plumbing the coolant hoses should not be that big of an issue...

I wanted to be able to roll the van chassis back for good access to the engine....but with the radiator up in the van this will be an issue..

Ah hell....we will take it one step at a time..

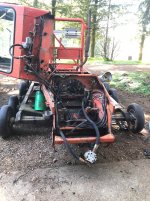
I am definitely leaning towards this idea of the V8 power and all the drive train down in the cat as it was....


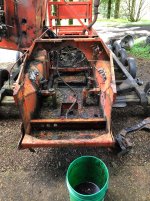
I was looking at the Cat yesterday and once the cab is off and the firewall/bulkhead is cut away...(Tilt cab 2100 has a bulkhead that the cab sits down over and bolts to...you can see it in the picture with the chevy mount) the tub will be wide open.

The existing rear tranny mount MAY be usable as is with only minor modifications....Gonna take a trial fit with an engine/tranny package in there.

Shifter linkage for the tranny is likely going to be best handled with a cable type unit.....

Maybe a floor mount......still a lot of pencil and paper and tape measure work to do.... but the entire package seems workable.

I really want to be able to use the entire dash cluster as is in the Van though.

Locate the battery in the van battery tray and wire things in using the stock harness "With slight mods)

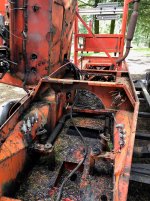
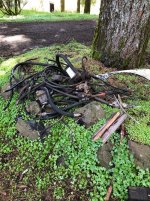
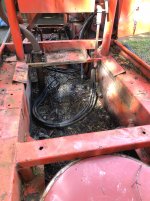
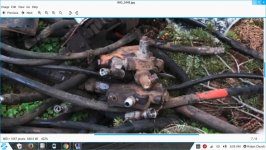
Today though it is back to yanking out the old hydraulic hoses and getting ready to remove the cab......

I do have ads on Craig's now hunting for a couple roaches to scarf up an engine and tranny and a Van body....

And here we goooooooooooooooooooooooooooo....:smile:
 

Attachments

  • Screenshot from 2020-03-22 05:36:07.jpg
    Screenshot from 2020-03-22 05:36:07.jpg
    72.8 KB · Views: 136

Snowy Rivers

Well-known member
There is another option on the engine and tranny.

455 OLDS and the TH400 (BOP CASE)

Huge torque monster...CHEAP TO BUY TOO....
Back in the 80's I used to install these in pickups for guys wanting big power when a 454 was sooooooooooooooooo hard to find.

Just a thought

:thumbup:
 

BearGap

Active member
GOLD Site Supporter
God you’re long winded girl! :laugh3: Let’s face we’re all looney or we would be spending all our money, time and knuckle skin to work on machines we have to trailer for hours just have fun. I’m crazy. But I think Snowy is crazier than me. It makes me feel totally normal when I read her wonderful ramblings. :th_lmao:

BTW, our friend would just have to look at the Thanks and positive replies to your posts to see how ridiculous his post was. He’s comparing you to sane people? Wrong blog dude!
Keep it going Snowy.
 

Pontoon Princess

Cattitute
GOLD Site Supporter
I see, you have changed your direction on the engine/body setup, have you considered building your own body, given the vast talents you have?
 

BearGap

Active member
GOLD Site Supporter
I can already see where this is going. These two work together and we get the first snow cat chassis that makes sense with modern parts. Look out guys...
 

Snowy Rivers

Well-known member
Thanks troops

Same body..."Astro van" for creature comforts and all the body connected items.

Keeping the power plant in the cat will make a lot less work....

I agree.
Ya gotta be crazy to even think about this stuff.

My feeling is that once the ideal direction is in the cross hairs this can happen easily

I really love our little Van and hate to lose it to the Cat.

The cat is not going to care what is turning the drive shaft.

I am forced to keep the costs as low as possible......

NOBODY wants a BOP case TH400 They are a boat anchor....except inside...all the same good stuff.

Olds sled from the late 70's are also a yard ornament.


Pontoon
No way on the body

The ASTRO has everything in a neat package.

Plug and play...just like Legos..
Body complete is way more work than I want..
 

Snowy Rivers

Well-known member
God you’re long winded girl! :laugh3: Let’s face we’re all looney or we would be spending all our money, time and knuckle skin to work on machines we have to trailer for hours just have fun. I’m crazy. But I think Snowy is crazier than me. It makes me feel totally normal when I read her wonderful ramblings. :th_lmao:

BTW, our friend would just have to look at the Thanks and positive replies to your posts to see how ridiculous his post was. He’s comparing you to sane people? Wrong blog dude!
Keep it going Snowy.

What sort of cat does the Other dude have...?????

I will admit...I AM OFF THE WALL ON THINGS.
BUT I HAVE A NICE 2100 THIOKOL SITTING IN FRONT OF MY SHOP NOW :clap:
 

Snowy Rivers

Well-known member
Got some actual CAT WORK done today.....

Ripped off all the blade cylinders and the brackets.

Hydraulic oil sucks too...
I was able to get most of it in a bucket.

I want to keep the cylinders in usable condition so I piled them up on an old disc out back with the hoses DOWN

I can get closer now....

Still a mile of hose in that beast.

Thinking about the idea of stuffing the 455 Olds engine in Cat.

A set of 5 inch side pipes right below the top of the tub rail (Plenty of room in there)
Maybe put a bit of a lumpy azz cam in the big Olds to make her sound BADAZZ....

Crazy ideas....I like it
 

Attachments

  • IMG_2421.jpg
    IMG_2421.jpg
    591 KB · Views: 109
  • IMG_2422.jpg
    IMG_2422.jpg
    523.5 KB · Views: 101
  • IMG_2423.jpg
    IMG_2423.jpg
    521.1 KB · Views: 104
  • IMG_2424.jpg
    IMG_2424.jpg
    477.4 KB · Views: 102

Snowy Rivers

Well-known member
Ideas...Ideas.... and more thoughts

I am still very much into my plan to use air on the steering.

IF we go with the Big OLDS OR????? engine this makes it easy to bolt on an engine driven air compressor as compared to the Van (NO ROOM)

Way cheaper set up and far more options than the electric pump plan.....

I am still concerned about brakes

AS long as the air is up your golden....lose the air and you are !@#$^D

The 2100 had a pretty herky drive shaft park brake.

I am thinking about ripping it off the C6 and having a look to see if it can be adapted to a TH400.

This is not a mass produced lash up...so whatever needs to be done to make things work is likely gonna be CUSTOM BY ME

The Ford output shaft is a different spline count than the GM TH400

Guess I will need to rip into it and see wasssssup.

I want to keep the factory Park lock in the tranny though.

Big trucks use a spring brake combo chamber for parking and for emergency

Lose the air and at around 20 psi the brakes come on and you are going to stop.....PERIOD

The drive shaft brake would be nice.....Just piece of mind....
 

BearGap

Active member
GOLD Site Supporter
You’re going to need a good getaway driver when it comes time to fund your tracks. There are a couple of rally drivers here that might be good for a winter heist...I mean withdrawal.
 

Snowy Rivers

Well-known member
Yeah

That thought has crossed my mind.

I am going to do a custom 2 belt set up

Using the original 2100 tire guides
12" belt on each side of the track plus the guide area yields a 36" track
Custom grousers (I will build them )

Just about have the design worked out on the grousers.
A couple ideas that should be fine for the application.

I can get the same rated belting from an outfit up in Washington that sells to the rock bizz for conveyors.

They will cut the belts to width at no extra cost.

About $13 foot

$600 for the 4 pieces.

No these are not going to be cheap.....but far cheaper if I set up and build my own rather than step up and call the big box cat supply.

Already working on a track assembly fixture plan

Gauges to keep the pitch correct.....

LOTTSSA WORK.

My fav plan for the grousers is bar size channel with 3/4" flange and adding a flat bar up one side on the inside (Skip weld in)

This cat is going to be a cruiser and not a groomer with a blade....so we can keep the tracks a tad lighter.....

The beasts that were on this machine were heavy as chit....

Was a handful even for my skid steer. (It was on tip toes a couple times moving the big track)

I would like to keep the total track weight per side at around 600 pounds or so. (Even 800 per track)
The 2100 tracks at 57" were nearly 1200 lbs maybe more.

I am hoping to be able to get a set of tracks built for around $800 or so.

PLUS SOME SKINNED KNUCKLES and BLUE AIR.. :hammer:

Tracks are only vaguely on my mind at the moment.

Still have a buttload of hoses to rip out of the cat.

The OC12 has to come out and I am going to have to rip it all the way down.

Weather is crap starting tomorrow.

Today I was fooling with a midland air compressor off one of our Army 6x6 trucks.
This bad boy will bolt up nicely to the Big V8 and is belt driven.

A far better plan than electric pumps (May consider a backup single electric as a getum home safety)

High speed air pumps are just a pain to source in a belt drive, and since we had this one laying on the shelf...why not.

This virus BS is putting a crimp in my style....I want to go take a peek at a 455 Olds engine to power the project.

But still I am trying to do something meaningful every day.

EVEN IF IT'S ONLY GETTING ONE HOSE OFF THE CHASSIS.

OMG I want to get serious on this.

With the cab tilted I can't even sit in it now and make snowcat noises :th_lmao:

Hey

Thanks for the reply......

I am being careful now not to get all excited and buy a bunch of parts until I am sure what is going to happen with the power plant/tranny

455 Olds and TH400 is the goal

Far less spendy than the big Chevy....and plenty of engine....yeah buddy.

I am feeling blessed now that there is a real snow cat in front of the shop though...
:thumbup::thumbup:
 

Snowy Rivers

Well-known member
Hope this finds all of you Cat Freaks healthy.....

Weather is nasty here with wind and rain, so not much other than a few tape measurements done to check on the ideas for the new power plant location.

I have a small project running that's inside work....but am waiting for some gaskets and seals to arrive.

Next week the weather is looking better...Hope to get back to removing the old hydraulics...

Best to all....
Stay safe
 

olympicorange

Active member
…… S/R,.. you have a lot of decisions to make,...but they work out as you move along. i'm guessing you're going to install an air dryer into your air system, to help with moisture issues. one suggestion for back up reserve air; you could ''tuck'' away a couple spare air tanks, with ball valves on the outlet side, plumbed into system for an emergency. like an accumulator, for a short distance, or to get it out of the way, from being stuck in the trail. an elec. /aux. backup air compressor, may work. as far as a driveline parking brake assy. , on the back of a TH400, is quite rare. more common on a 4L60/4L80. just sold one recently. another idea ; for a p/b; using a ''trolley'' valve setup, like for a T/T brake for the trailer service brakes; plumbed into the brake band actuators (from either air supply) , to lock up the brake bands,.... just a few ideas to clutter up your decisions....:thumbup: lol
 

Snowy Rivers

Well-known member
UH HUH

Decisions....oh yeah.

I am at a nice crossroads at this time.

Many things can be explored and looked at right now without really committing to anything 100%

As much as I like the idea of the drive on/off plan there were some serious flaws that very well may have been bad.

Going with the engine back in the Bilge of the beast is likely a good idea overall.

A TH400 box is another plus.

I LOVE big blocks A LOT

BUT... the fact is I do not need all that power.....break stuff.....no no no..

The engine used most for projects are the Chevy Mouse motor.

Everybody makes goodies to fit them.

Mounts, brackets.....everything is cheap too.

I called on a 305 and a 350 yesterday.

Not going out until this virus thing is gone.

A 305 will also cool real well with a stock Astro radiator too...

Leaning that way....(Small block) and they are cheap to buy....

And likely will not break anything valuable...


As soon as the virus is off the table I am going to trip the hammer on something.

I don't want to do it twice.....
 

Snowy Rivers

Well-known member
Good question......

Replacing the 391 with a small block will knock off a bit (100 lb)
Removing all the hydraulics, hoses, pumps, valves, filters, tank, the blade rigging with cylinders, roll bar, cab will likely knock off 1500 lbs maybe a bit more.

The Turbo 400 is similar in weight to the C6.

Lighter tracks should knock off 1000 lb

Add back the van body and the needed steel tube to support and mount the body to the 2100 tub......

Factory weight on the 2100 was close to 7000 lb

I am gonna guess somewhere in the 6000 lb area.

The van curb weight was listed as about 4000 lb
Remove the engine 425#
Tranny and front cradle 500#
Rear axle 150#

Crunching the numbers.....6000 lbs seems reasonable

A Spryte is about 4000 lbs

The frame and tub on the 2100 are much heavier than the Spryte frame.

It will be interesting to see what it turns out to be.

We have a DOT scales close by and so we can weight it...

I am not particularly worried about the weight....with 36" tracks it will be workable...

I am guessing at a lot of things on this build.... certainly not your basic snow cat rebuild and fluff up....

Every turn of the corner leads to more questions and HOW DO WE SOLVE THIS issue???...AND WILL THIS FIT ??? type of thing... :hammer::hammer::hammer:

Far more mental work on this type of project than simply beating on the tin and fixing up somebody else's design...

I spent several hours yesterday mulling over what to do for a tranny shifter..

Cable stand alone floor shifter (Winters side winder seems to fit the bill)

The column shifter in the van is basically more trouble than it's worth due to the electronic position display.

And on it goes....
 

Jim_S

Gone But Not Forgotten
GOLD Site Supporter
Crunching the numbers.....6000 lbs seems reasonable

We could have a contest. Closest to actual weight with a full tank gets a free ride.

:clap:

My entry is 6,233# ( subject to update if you decide to install the auxiliary Perkins diesel from your sailboat instead of a V8)
 

Snowy Rivers

Well-known member
Coooooool

I was just cruising through engine out the front posts at the Astro/Safari sites

A used van with a dead engine can be very cheap.

Getting the engine out is a pain.

These go up from the bottom when new.

But GM made marks on the core support and a kit to cut the core support and remove the engine out the front

I do not want to fight getting the cradle out the bottom in the yard in front of the shop (Hoist is needed)

Just getting the dead engine out...trans too is all we need.

If need be we can take it out a piece at a time......

Leaving the front suspension will make getting the van on the cat chassis much easier.

Rear axle can stay too.....yes these add a bit of weight, but the biggy is getting rid of the V6 and 4l60 trans
I Still come back to a bracket on each corner at the lug bolts to anchor the van.
Easy, cheap and very sturdy

I am limited as to how much heavy lifting we can do here as we do not have a hoist...just the skid steer and the little tractor.

Engine lift...no worries, we have one of those...

Tranny...cut it loose and it will find the ground.....

Having a set of those micro spare tire/wheels on 4 corners will allow moving the van and getting it on the cat

The thinking on this is beginning to get very tiring, but should make life far easier and much less trauma on the pocket book when it comes time to roll the van onto the 2100.

Far too many mistakes that cost big $$$$$$$$$$$$ can be made when attempting a Franken project.

Been there before and regretted the mistakes a lot.... mostly the $$$$$$$$ spent that was wasted......

We shall see what shakes out on the weight ....


I have a friend who is retired from Boeing (Last year) and we have discussed this project in depth.

He mentioned many times of how stuff is built in the computer and everything is looked at and tested (Then things still don't always work) 737 max
 
Last edited:

Snowy Rivers

Well-known member
Weather cleared a bit and I'm suffering cabin fever bad.

Grabbed the tools and went after the Cat.

I wanted to get as much of the hydraulics nightmare out as possible.

Fitting are in places that no sane person would dream of putting them.

A lot of hoses were started at one end and then the last clowns just built on them as they went.

I started up at the front and plowed into the beast.

Getting some of the hose fittings loose was a real nightmare to say the least.

But I am at the point that whats left is connected to the cab (Rear hydraulics only) so I am going to coil them up and tie them to the cab with the open ends down to keep water out....Somebody is going to want the cab....and having the controls usable.

Terribly sloppy gooopy mess

A bit more work and the cab can come off and we will be ready to muck out the bilge..

After things are a bit cleaner and the weather warms the OC12 can come out and come apart......


A few pics

One showing where I started today.

And the pile of hoses and other crap....
 

Attachments

  • IMG_2424.jpg
    IMG_2424.jpg
    477.4 KB · Views: 219
  • IMG_2447.jpg
    IMG_2447.jpg
    523.8 KB · Views: 222
  • IMG_2448.jpg
    IMG_2448.jpg
    491.4 KB · Views: 219
  • IMG_2449.jpg
    IMG_2449.jpg
    625.5 KB · Views: 223
  • IMG_2450.jpg
    IMG_2450.jpg
    402.7 KB · Views: 222

Snowy Rivers

Well-known member
Need anything ????

Tilt cab
Hydraulic pump
Priority valves (3)
Electric emergency hydraulic pump
Complete disc brake on the rear of the C6
Differential oil cooler pump assembly with filter
Main hydraulic filter assembly

These items need a home

Also have most of the blade and rigging
 

KickerM

Active member
Site Supporter
GOLD Site Supporter
Howdy Snowy,

What does the pump look like and the priority valves? Was the pump front mounted on the front of the engine crank pully?
 

Snowy Rivers

Well-known member
Pump was front mounted driven by a cog belt

There are 3 priority valves in the cat.
The piccy is of the two that were on the LH side of the tub
There is one still in the cat, but with the cab tilted It's gonna have to wait until I get the cab removed (Soon as the weather improves in a few days)

Here are some pics of the parts..

The system was closed up until the other day....oil looked good..

The pump ports are plugged now to keep crud out.
 

Attachments

  • pump.jpg
    pump.jpg
    130.5 KB · Views: 164
  • Screenshot from 2020-04-04 06:05:28.jpg
    Screenshot from 2020-04-04 06:05:28.jpg
    105.2 KB · Views: 167

Snowy Rivers

Well-known member
Weather is horrible and can't get much done outside on the chassis.

But.....I had planned on a set of rear hydraulic brakes and now was a great time to get going on building some of the parts.

One of our members "Snowcatcrazy" did a nice job adding outboard brakes to his 2100 based Chevy van

After looking over the pictures he had posted of his set up I decided to go ahead and use parts I already had sitting here on the shelf.

The Astro van has a lovely hydroboost brake system and simply rerouting the brake lines from the front calipers on the van to the rear of the cat is a no brainer.

The extra rotors, calipers and knuckle were just perfect to modify and mount.

Here is a piccy of What the other fella did....

I disassembled the suspension parts I had and got a plan going.

Tossed one of the knuckles in the mill and started chewing off the extra appendages that are just dead weight.

The cost of all new parts although not staggering is hefty....and the used materials will be just fine and using the front caliper from the van chassis will keep the system basically intact.

Today I need to clean up the mill area as it is getting to be a mess.

Then the knuckle goes back on the table and the last large bump comes off

The factory knuckle will work sweet to hold the caliper as these are non bracketed calipers
 

Attachments

  • Screenshot from 2018-02-03 06:03:10.jpg
    Screenshot from 2018-02-03 06:03:10.jpg
    124 KB · Views: 161
  • IMG_2457.jpg
    IMG_2457.jpg
    288.7 KB · Views: 168
  • IMG_2456.jpg
    IMG_2456.jpg
    233.1 KB · Views: 169
  • IMG_2455.jpg
    IMG_2455.jpg
    254.2 KB · Views: 162

Snowy Rivers

Well-known member
I appreciate the "Likes" troops

I know the some may find this stuff boring and "Uncat" like.

Fact is that a ground up build using bits and pieces can be very distracting and end up wobbling all over the place with little seemingly unrelated projects going on.

Yesterday was pretty mundane.....

Tore into the other brake knuckle and ripped off all the extraneous parts.

Got it all down to just the knuckle, caliper and the rotor.

I do not feel all warm and fuzzy about hanging the caliper on a bracket without support from the axle as the original does.

I am leaning towards adding a bearing into the original bore that the wheel bearing occupied to support the entire brake reaction assembly, and then adding the bar to the frame to vector the turning motion....

Doing this will take a lot of stress off of the reaction bar that fastens to the frame.....

Technical stuff.....nothing real fun to see or talk about, but now is the time to sort it out while there is nothing in the way on the frame (TRACKS)

Good weather coming up....Gonna finish dealing with the last hydraulic lines and then get the cab off...

Really tired of dealing with that big orange lump that's in my way....

Gonna be great to finally get into the bilge with a shovel and clean out all the crap....

Not much else at the present....
 

Snowy Rivers

Well-known member
Update on the brake engineering...(Imagineering)

Spent a couple hours measuring and fiddling with the Brake hardware yesterday...

The plan is looking really good now.

I need to fabricate and machine (2) two adapters that will allow the 5 bolt Astro brake hub to bolt to one side and the other side to bolt to the 2100 axle (Piloting into the sprocket and using the original 8 lug studs...albeit we will need to swap out the studs for longer ones to allow the extra flange to fasten up)

I need a piece of 4" schedule 80 steel pipe and 4 round burnouts 5/8" thick x 7-1/2" diameter

The dimensions are looking good...just need to get a wheel guide off of a track to finish calculating the distance out from the sprocket to set the brake assembly.
It would suck to end up with the tire guides hitting the caliper :OhNo:

Lets hope I can get some materials today.

Weather is really looking nice for several days.

Time to go after getting the cab off the tub......

I will get pix when I have something new and interesting.

:hammer::hammer::hammer::hammer:

Found a steel shop in Salem, Oregon that should have what I need.

Their web site says they are open during the virus thing.

I will call them as soon as they open up this morning
 

Snowy Rivers

Well-known member
Well I called the shop in Salem...They only sell the 4 inch steel pipe in 21 foot lengths....I DON'T THINK SO////

Found a steel outlet closer to me that had the 4 inch schedule 80 pipe AND they had a huge selection of water cut rounds.

I got 2 feet of the pipe and four 1/2" x 8 inch rounds. $62 for all of it....

The water cut rounds do not tear up the carbide tools :clap:

I got some measurements off of the wheel guides and was able to get some good dimensions for the length of the adapter.

The plan is to torch the bolts off of one wheel guide and get it out and in my hand so I can be really sure of the offset for the brake units....

Some pics of the steel pieces and the brake unit sitting with the sprocket....

With the good weather I think tomorrow will be a day to work at getting the cab off of the Cat...

But .....with the steel parts I can start whittling away and build the brake units....
 

Attachments

  • Brake adapter parts1.jpg
    Brake adapter parts1.jpg
    384.6 KB · Views: 106
  • Brake adapter parts3.jpg
    Brake adapter parts3.jpg
    309.2 KB · Views: 107
  • Brake adapter parts5.jpg
    Brake adapter parts5.jpg
    329.3 KB · Views: 105
  • Brake adapter parts6.jpg
    Brake adapter parts6.jpg
    354 KB · Views: 113
  • Brake adapter parts 2.jpg
    Brake adapter parts 2.jpg
    366.8 KB · Views: 111

Snowy Rivers

Well-known member
THE CAB IS FINALLY OFF

Got after the cab this morning and worried out the rusted bolts holding the cab hinge onto the tub.

Then came the tedious task of grinding off the welds that some clown slobbered on the hinge to fasten it to the tub???????

A bunch of 7/16 bolts holding the hinge on, so why weld it.

After a couple hours of careful grinding the cab was ready to come off.

Still gonna have to weld in and fix the gouges I put in the top rail of the tub.

No real biggy....just a Pain in the butt.

The skid steer made quick work of the cab removal once it was loose.

Tomorrow the plan is to start mucking out the bilge.

Got the little tractor handy to carry the junk off to the burn pile.

I am thinking that the next step is to jack up the rear of the cat and get the Diffy out and start getting it apart.

I know the drop boxes have water in them, much as the diffy did.

Once the diffy is out it will be a good time to hit the bilge and the rest of the cat with the big hot washer.

If we can get this virus thing out of the way I need to scare up a Small block chevy and a Turbo 400 to start getting the mounts and such figured out.

While the diffy is in "Waiting for parts mode" I can fill in with working on the disc brake assemblies.


What fun.
 

Attachments

  • IMG_2472.jpg
    IMG_2472.jpg
    484.9 KB · Views: 81
  • IMG_2473.jpg
    IMG_2473.jpg
    398.6 KB · Views: 91
  • IMG_2476.jpg
    IMG_2476.jpg
    570 KB · Views: 92
  • IMG_2475.jpg
    IMG_2475.jpg
    593.4 KB · Views: 84
Top