• Please be sure to read the rules and adhere to them. Some banned members have complained that they are not spammers. But they spammed us. Some even tried to redirect our members to other forums. Duh. Be smart. Read the rules and adhere to them and we will all get along just fine. Cheers. :beer: Link to the rules: https://www.forumsforums.com/threads/forum-rules-info.2974/

ST4 back from the dead

Puckle

Well-known member
SUPER Site Supporter
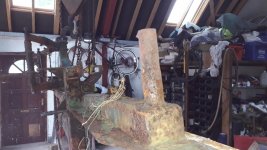
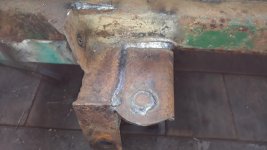
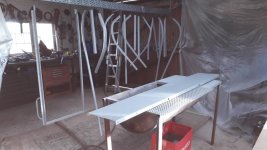
Had to fix windscreen wipers before painting new cab - the old spindles had completely rusted away along with the windscreen surround.
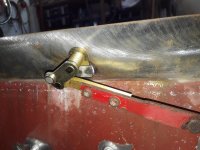
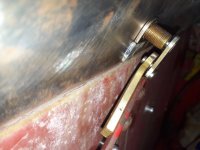
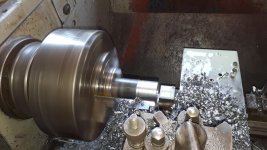
New Bug spindles (111-955-215/F ) fitted ok but were not quite the same and required new brass end pieces making for the link arms and small rotation stops spot welding to window surround.
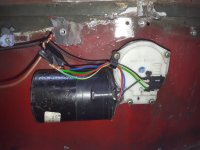
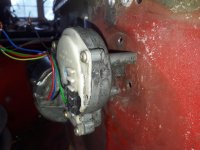
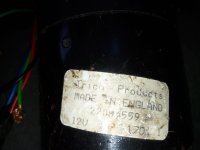
The wiper motor was shot as well (brush mounting plate had rusted away) but I had one at the back of the shed that fitted after re-drilling the mounting holes - I think it was off an Audi A3 but not sure.
 

Attachments

  • 20200727_143227.jpg
    20200727_143227.jpg
    114.1 KB · Views: 467
  • 20200727_143215.jpg
    20200727_143215.jpg
    66.4 KB · Views: 473
  • 20200727_143331.jpg
    20200727_143331.jpg
    90.2 KB · Views: 465
  • 20200727_143249.jpg
    20200727_143249.jpg
    81.2 KB · Views: 457
  • 20200727_143345.jpg
    20200727_143345.jpg
    95.2 KB · Views: 469
  • 20200727_145458.jpg
    20200727_145458.jpg
    50.9 KB · Views: 478

Puckle

Well-known member
SUPER Site Supporter
Everything stripped off now so I can get at the chassis - needs new rear cross-member and new front axle carrier spindles but otherwise not too bad considering its suffered well over 50 Scottish winters!
 

Attachments

  • 20200805_172324.jpg
    20200805_172324.jpg
    91 KB · Views: 450
  • 20200805_172344.jpg
    20200805_172344.jpg
    96.7 KB · Views: 452
  • 20200805_172359.jpg
    20200805_172359.jpg
    88.1 KB · Views: 444
  • 20200805_172434.jpg
    20200805_172434.jpg
    97.8 KB · Views: 456

Puckle

Well-known member
SUPER Site Supporter
Right, that's got most of the chassis problems sorted, legs straightened, new body mounting rails, new front axle pivots and pins, new rear cross-member, new front spring mounting plates and new side plate fitted to axle housing. I need to turn it upside down now to complete the welding then shot blast and paint.
 

Attachments

  • 20200807_090048.jpg
    20200807_090048.jpg
    84.4 KB · Views: 428
  • 20200807_090100.jpg
    20200807_090100.jpg
    84.2 KB · Views: 426
  • 20200809_164858.jpg
    20200809_164858.jpg
    102 KB · Views: 428
  • 20200809_164916.jpg
    20200809_164916.jpg
    88 KB · Views: 432
  • 20200809_165000.jpg
    20200809_165000.jpg
    104.9 KB · Views: 430
  • 20200811_105721.jpg
    20200811_105721.jpg
    101.3 KB · Views: 432
  • 20200811_105827.jpg
    20200811_105827.jpg
    87.9 KB · Views: 433
  • 20200811_105836.jpg
    20200811_105836.jpg
    93.8 KB · Views: 434
  • 20200813_092510.jpg
    20200813_092510.jpg
    110.6 KB · Views: 422
  • 20200813_123243.jpg
    20200813_123243.jpg
    94.7 KB · Views: 420
  • 20200813_125622.jpg
    20200813_125622.jpg
    66.1 KB · Views: 430
  • 20200813_130012.jpg
    20200813_130012.jpg
    71.7 KB · Views: 432
  • 20200813_171806.jpg
    20200813_171806.jpg
    65 KB · Views: 428
  • 20200813_171818.jpg
    20200813_171818.jpg
    64.9 KB · Views: 429

Puckle

Well-known member
SUPER Site Supporter
finally manged to start getting paint on after hours of stripping and shot blasting- had to send the chassis out for the blasting as my compressor blew up just as I started and filled the blast pot with oil - very helpful!
Decided not to risk shot blasting ally panels so have used several gallons of paint stripper - managed to find one that still contains some DCM so still works - the picture of the two panels shows one with Nitromors and one with Sysnstrip - the Synstrip worked twice as fast and required fewer coats but still took forever to get through the ten layers that had accumulated.
The plan is to get everything covered with two coats of epoxy primer, and then assemble the whole body for primer filler/fairing then topcoat - hopefully the weather will hold out for long enough to finish the painting before it gets too cold.
 

Attachments

  • 20200901_102707.jpg
    20200901_102707.jpg
    162.1 KB · Views: 374
  • 20200901_102727.jpg
    20200901_102727.jpg
    71.9 KB · Views: 374
  • 20200903_174251.jpg
    20200903_174251.jpg
    72.7 KB · Views: 374
  • 20200903_174341.jpg
    20200903_174341.jpg
    59.9 KB · Views: 384
  • 20200903_174350.jpg
    20200903_174350.jpg
    80.7 KB · Views: 370

Puckle

Well-known member
SUPER Site Supporter
Finally got the body assembled and painted, driven me nuts with wrinkling, micro blisters, runs etc. - you just get one panel right and it then decides to pickle up somewhere else and it's back to the wet-n-dry to cut it all back. Still a bit disappointed with the finish but run out of patience now - I'll get back to mechanical things for a bit before I start to paint the hood, door slam plate etc.
All the panels have been assembled with polysulphide sealant to keep the moisture out - certainly sticks well - I had to dismantle all the rear panels and re-do them as when I came to fit the roof the alignment was miles out - that's a problem with an all bolted assembly - it goes together slightly different every time!
 

Attachments

  • 20201007_100935.jpg
    20201007_100935.jpg
    141.4 KB · Views: 330
  • 20201007_100947.jpg
    20201007_100947.jpg
    142.2 KB · Views: 334
  • 20201007_101005.jpg
    20201007_101005.jpg
    110.6 KB · Views: 329
  • 20201007_101729.jpg
    20201007_101729.jpg
    130.2 KB · Views: 326
  • 20201007_101743.jpg
    20201007_101743.jpg
    80.2 KB · Views: 331
  • 20201007_102808.jpg
    20201007_102808.jpg
    128.1 KB · Views: 336
  • 20201007_102833.jpg
    20201007_102833.jpg
    104.3 KB · Views: 335

Snowy Rivers

Well-known member
Fabulous job.....

Don't beat yourself up.....this machine is a sweetheart..

You have done a fabulous job of bringing it back from the valley of the shadow of death........:thumbup::thumbup::thumbup:
 

Puckle

Well-known member
SUPER Site Supporter
Been doing a bit of machining as a nice change from cleaning and painting - these are new suspension bushes in Delrin, an ultra high density acetal that is self lubricating, so does not need grease everywhere - may still re-fit the zerks though in case the spindles start to corrode.
 

Snowy Rivers

Well-known member
So nice to have machine tools.....

These projects are almost impossible without machine tools.

Mine would have been stopped dead without the lathe and the mill.

Looking great

Another great material for bushings is UHMW...."Ultra high molecular weight" polyethylene

Wears like iron....
 

Puckle

Well-known member
SUPER Site Supporter
p****d off with poxy pickling paintwork so thought I would do a nice bit of detailing and fit the luggage rails and mats. I'm sure using Rhino liner paint would be more practical, but I don't think it would look as good as the ribbed rubber sheet and Ally trim. I also put the graphics on the side - I had downloaded the correct template from this forum, but it was easier to order them with a standard font rather than get the pdf file printed off and it seems a fairly close match.
 

Puckle

Well-known member
SUPER Site Supporter
Starting to put windows back in - tricky little job that turns out to be. Watched some video's on you tube with clever people putting them in with bits of string but couldn't get that to work at all - best method seemed to be putting the rubber around the opening then inserting the window from outside and using the strip inserting tool to pull the rubber out and over the glass whilst pushing it in. Inserting the sealing strip was ok with the correct tool but very tight - I could only find new rubber with 7mm web, slightly bigger than the original and supposedly only suitable for minimum 100mm radius corners (snow-tracs are 68mm). Got 5 originals back in so far, now waiting for some replacements to turn up that I have had made.
 

Puckle

Well-known member
SUPER Site Supporter
Partially stripped down the engine to paint it and found the carb manifold heat riser tube blocked - read some stuff on Samba about burning the carbon out with oxygen but decided easiest way was to drill 5mm hole and spin a length of rod through it with the end bent over - this worked a treat and it was a simple job to weld the small hole up afterwards.
Not having much luck with this new format Doc has changed to - keeps saying pictures are too large - I'll try again later.
 

Puckle

Well-known member
SUPER Site Supporter
Also, finally received 14 new small wheel rims that I ordered back in July - these are made by Vlukon in Netherlands and are slightly more robust than the originals - 3mm steel rather than 2mm - see drawing attached
 

Cidertom

Chionophile
GOLD Site Supporter
what did you use for the tires on the new small wheels? And were the Vlukon rims a part that can be ordered, or were they special built for you?
 

Puckle

Well-known member
SUPER Site Supporter
Hi Tom, I've used Trelleborg 100/100-4 (4.00-4) 6 PLY T539 TT - I've not had any experience with these but they are the correct size and are 6 ply so should be ok - they are also quite cheap over here - £26.00 each.
The Vlukon rims are a standard product - e-mail Hans Haas <h.haas@vlukon.nl> and he should be able to quote you - rims are ref 6991 and can be had in various RAL colors - I had silver and they were approx. 30 euro's each pair
 
Top