• Please be sure to read the rules and adhere to them. Some banned members have complained that they are not spammers. But they spammed us. Some even tried to redirect our members to other forums. Duh. Be smart. Read the rules and adhere to them and we will all get along just fine. Cheers. :beer: Link to the rules: https://www.forumsforums.com/threads/forum-rules-info.2974/

HID's for Blackie!

tiredretired

The Old Salt
SUPER Site Supporter
Well, Blackie is my truck. I name my vehicles. I do not know why I do that, but always have ever since my very first car.

At any rate, it is time to upgrade the headlamps from the dim, worthless halogen reflector lamps to HID. My other two vehicles have it from the factory, so time to mod Blackie and see again when I drive my truck at night.

So, I ordered two stock OEM headlight housings to do the mod with so I can continue to drive the truck and not have to hurry this project through.

I also purchase two Morimoto Mini H1 7.0 Bi-Xenon Projector housings and shrouds. Not yet decided on which ballast kit with ignitors and HID lamps to buy. Most likely Morimoto, but may go with Philips.

This can be somewhat involved project as aiming the projectors precisely can be tricky and time consuming. Given the fact I have never done this before, this could take a while. Everything has to be just so, as I am not going to be one of those asswipes who drives around at night blinding everybody. The cutoffs need to be right as well as the left and right aiming.

First thing is waiting for this heat wave to subside a bit, to heat these housings in the oven to soften the butyl, so I can take them apart and see what I am up against getting these projectors to fit.

Stay tuned.
2017-06-12 17.42.59.jpg
 

Melensdad

Jerk in a Hawaiian Shirt & SNOWCAT Moderator
Staff member
GOLD Site Supporter
Interested to follow this. Keep us informed. With lots of photos.
 

tiredretired

The Old Salt
SUPER Site Supporter
I've decided to build my own relay harness. That way I will know what all the components are.

#16 awg wire for the control circuits and #14 AWG for the Ballast / Ignitor circuits.

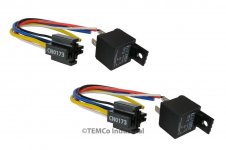
The Relays will be Temco Industrial which use #14 AWG wire for terminals 30, 87 & 87A which is the NO and NC contacts. These are Bosch style automotive relays and excellent quality. Stock photo:

temco.jpg

Blackie currently uses a halogen 9007 dual filament bulb for high and low beam. I will use the 9007 socket that currently plugs into the halogen bulb to supply control power 12VDC to power the relays. The issue is, only low or high beam is energized at the same time, not both. To power the HID ballasts, I need both to be hot to keep the ballasts energized. High beam is achieved by a motorized cutoff shield inside the projector housing. In order to make this work, I designed a circuit with two diodes to make this happen. The Solenoid is what power the cutoff and creates either high or low beam. Also, notice the diodes eliminate the possibility of feedbacks going back to the multi function headlight switch. Notice how terminal 86 on the relay is energized on both high and low beam but the solenoid is energized only on high beam.


wiring diagram.jpg

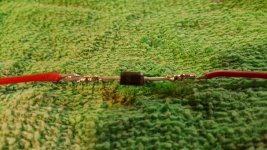
For diodes I am using a 3A 50V barrel diode.

2017-05-25 20.13.00.jpg
 
Last edited:

tiredretired

The Old Salt
SUPER Site Supporter
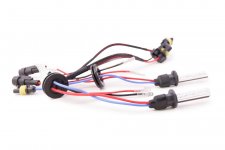
I am thinking I will go with the Acme Standard 35 Watt 5000K HID bulb from the Retrofit Source dot com. They are cheap enough at 20 bucks to have as a backup spare if I decide later I want something more OEM like Philips. Stock Photo. Still trying to decide on the ballasts and ignitors but if I go with Acme on the bulbs, I may as well go with Acme on the ballast kit. Got to think about this for a bit though as I do not want to change my mind and end up having to send stuff back as all this is internet shopping.

acme_standard_h1_hid_bulbs_4_2_1 (1).jpg
 

MrLiberty

Bronze Member
Site Supporter
I can do the old style headlamps that were on a car no problem, but today no way. Give me an old 65 Chevy any day. :biggrin:

classic-65-chevrolet-impala-ss-resto-mod-two-engines-including-origional-327ci-4.JPG
 

tiredretired

The Old Salt
SUPER Site Supporter
I can do the old style headlamps that were on a car no problem, but today no way. Give me an old 65 Chevy any day. :biggrin:

classic-65-chevrolet-impala-ss-resto-mod-two-engines-including-origional-327ci-4.JPG

LOL, the attached file name of that picture says "classic-65-chevrolet-impala-ss-resto-mod"

Somebody is doing some modernizing to that old girl. Those Cragar S/S wheels are the best looking wheels ever. Old School Cool, IMHO. :biggrin:
 

tiredretired

The Old Salt
SUPER Site Supporter
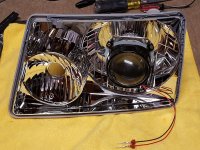
Up early this morning so I decided to fire up the oven and bake a housing. 250 degrees F for 25 minutes and I got the clear cover off the housing. It barely softened up the butyl rubber sealant enough but I got it. Next housing I will up the temp a bit.

As expected, the projector does not fit inside the housing. It looks good in the picture, but the glass lens of the projector hits the clear cover on the inside. No biggie, I expected that as a ruler does not lie. The next tool in this project will be a dremel with 1 1/2 cutting wheels to modify the back of the housing.

I have a battle plan moving forward, but lack the parts to do it, so I shall remove the other clear cover and clean up the old butyl.

Stay tuned.

2017-06-13 11.53.49.jpg
 

tiredretired

The Old Salt
SUPER Site Supporter
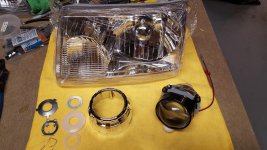
Things just got a bit easier. Rummaging through all the parts that came with the projectors for different application, I found a washer with a tab on it at the 12 O'clock position and another tab that goes into a key way on the shaft. Nice, real nice. Using this washer temporarily and lining up the tab to the notch on the housing this will give me almost perfect alignment to drill the holes for the 8-32 mounting bolts. That needs to be done before I dremel the back of the housing to move the projector back approx. 15mm or 5/8" to clear the front lens.

Stay tuned.

20170613_133321.jpg
 

XeVfTEUtaAqJHTqq

Master of Distraction
Staff member
SUPER Site Supporter
When I drive my commuter I hate HIDs in trucks - they are too bright for on coming traffic.

I have an led light bar and fog lights in my truck - I can light up the night with everything turned on.
 

tiredretired

The Old Salt
SUPER Site Supporter
When I drive my commuter I hate HIDs in trucks - they are too bright for on coming traffic.

I have an led light bar and fog lights in my truck - I can light up the night with everything turned on.

Some do not bother to install HID lights in projector housings, preferring to go the cheap route and mount them in reflector housings. This is against the law and dangerous.

Others will use the projector housings but fail to aim the lights properly either through ignorance or indifference. Use of cheap Chinese ebay crap does not help the situation.

The projectors need to be aligned according to DOT specifications to keep the internal cutoff below the line of sight of oncoming traffic.

The X & Y axis need to be precisely aimed not only to maximize road illumination but to eliminate glare.

My installation will be done right and be better then OEM. Stay tuned.
 

tiredretired

The Old Salt
SUPER Site Supporter
Grabbed a little spare time this evening and cut out one light housing and drilled the holes for the 8-32 mounting bolts. The cover fits now, but I still need to fine tune it a bit. The holes need to be elongated a bit for rotational adjustment and after a test fit tomorrow on my truck I think I will recess the projector another 1/4 - 3/8.

You may have noticed why 3 mounting bolts instead of 4? That's because 3 bolts makes adjustment for the x / y axis much easier then if I had done 4. Easier to fine tune and make the slight adjustment. The bottom bolt for x axis or elevation and the left bolt for the y axis or left & right. The right bolt is along for the ride to pivot on and stabilize the mounting. You may have noticed that all car headlamps use 3 points for adjustment so I cannot take credit for this revelation. :yum:

20170614_222913.jpg

20170614_222933.jpg
 

tiredretired

The Old Salt
SUPER Site Supporter
OK, the building portion of this projector retrofit is done. Of course the lens is not sealed, pending further alignment once mounted on the truck.

I plasti dipped one shroud black to see how it looks versus leaving it chrome. I have decided not to black out the entire housing as I originally intended. The ones I have seen on the internet I do not like as much as I thought I would. The end product will be primed with adhesion promoter and rattle canned with Fusion Black Satin.

I like how the black shroud reflects black back on the housing bowl giving it a black chrome look. A test fit on the truck looked really good.

2017-06-16 12.53.27.jpg
 

tiredretired

The Old Salt
SUPER Site Supporter
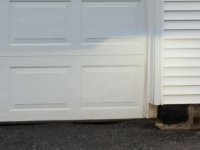
OK, finally had an opportunity between raindrops to fire up one headlamp for a brief moment when it stopped raining for five minutes. I installed the headlamp running the ballast off of a portable power pack. Not very dark but better then nothing right now. No adjustments made yet. This is first time firing it up. The cutoff is high at 25 feet and no idea where the alignment point is is relation to where it should be. The alignment point is that offset you see in the cutoff of the light beam just right of the center of the door. That offset indicates center beam of the projector. The hotspot looks pretty good but may be a bit off to the right which would mean shimming the bulb just a titch toward the left, but to be honest it is so close I asked for opinions on another forum.

The projector bowl is running a temperature of 212F so that is within the limits of all the components. So far so good but still a long ways from epoxying the projector to the housing and calling it a project.

20170623_181558.jpg
 

tiredretired

The Old Salt
SUPER Site Supporter
Final testing done and the beam pattern looks good measured at 25 feet.

Next up complete the wiring harness with relays and diodes and do final aiming when complete.
2017-06-24 22.00.32.jpg
 

tiredretired

The Old Salt
SUPER Site Supporter
Project complete. Everything came out outstanding and clean. The headlights on the road stretch out very nice with a clean cutoff and zero glare to oncoming traffic.

Turns out the bulbs need shimming due to very slight variances in manufacturing. Just a variance of less then a mm makes a huge difference. The more expensive Phillips or Osram bulbs are better in this department but cost well over a hundred bucks for a set. Not sure what one gets for their money with these as they are rated for the same 2000 hours as mine are and mine are more then bright enough. I will say I have gotten good at installing and removing these light housings. I must have done it a hundred times during the aligning and aiming process.

My goal was a good dependable system purchased from a reputable company that stands behind their products, more light on the road at night without comprimising safety to other by blinding them. In effect mimicing a factory OEM install in both performance and in looks. I feel I met those goals with flying colors.

Oh, and the cool factor is nice too. Those super white 5000k lights look like old TR is driving is driving one of those fancy MB's or Audi's at a mere fraction of the cost, until they get close enough and see it's a Ford :yum:. Old TR loves it and his bank account loves it too. As my Dad used to say, all it takes is time and money and you can do anything you set your heart on.
20170627_051942.jpg

20170627_063809.jpg

20170628_060431_001.jpg

20170628_060502.jpg
 
Last edited:
Top