• Please be sure to read the rules and adhere to them. Some banned members have complained that they are not spammers. But they spammed us. Some even tried to redirect our members to other forums. Duh. Be smart. Read the rules and adhere to them and we will all get along just fine. Cheers. :beer: Link to the rules: https://www.forumsforums.com/threads/forum-rules-info.2974/

SW-48 Restoration...

benz9

New member
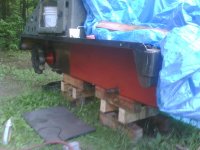
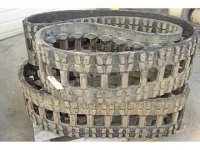
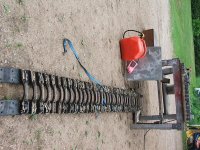
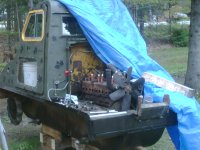
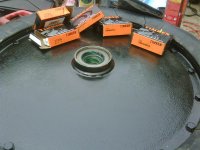
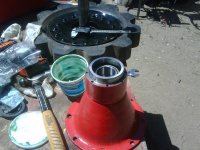
First of all, sorry for being such a lurker lately. I've followed closely most of the threads going on. I've been busy since the snow disapeared early here in Canada...taking apart my SW-48 and finding what 35 years of no proper maintenance can do to a machine. After removing all the wheels and finding most of the bearings rusted or half rusted (water line...), figured the suspension would be the same. Took the suspension apart too and found seized bearing, missing seals, rusted cups... Here are a couple of pics, just got so into it that I forgot a some points to take pictures. First pic shows where I drew the line --> no more disassembly, gonna go over budget!
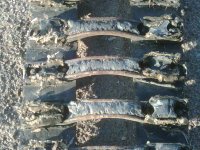
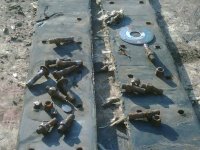
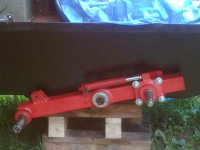
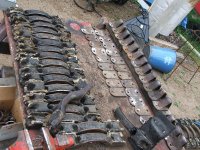
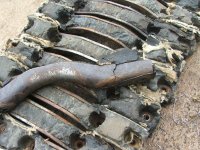
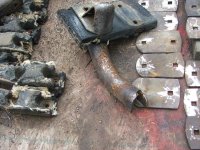
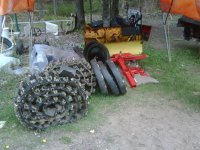
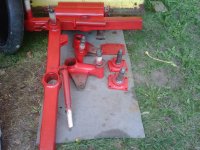
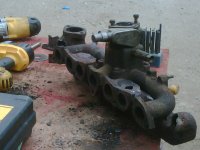
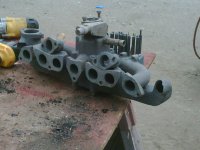
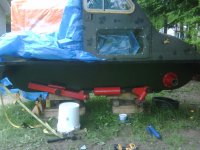
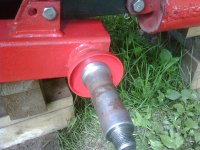
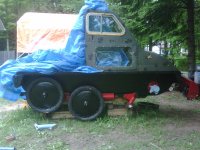
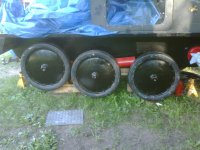
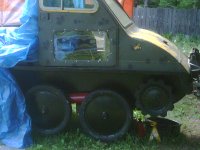
Second pic shows wheels and suspension parts, sandblasted down to bare metal, primed and 3 coats of paint! Third, close-ups of suspension parts, some still needing repair (front wheel arm). Fourth pic shows the intake/exhaust manifold before sandblasting and fifth, after. More to come...
 

Attachments

  • IMG00052-20100430-1229.jpg
    IMG00052-20100430-1229.jpg
    97.6 KB · Views: 1,711
  • IMG00053-20100430-1229.jpg
    IMG00053-20100430-1229.jpg
    94.6 KB · Views: 1,691
  • IMG00048-20100430-1227.jpg
    IMG00048-20100430-1227.jpg
    122.7 KB · Views: 1,678
  • IMG00054-20100430-1322.jpg
    IMG00054-20100430-1322.jpg
    122.1 KB · Views: 1,669
  • IMG00051-20100430-1228.jpg
    IMG00051-20100430-1228.jpg
    138.2 KB · Views: 1,700

benz9

New member
For some reason, the second post I did yesterday didn't show up...:whistling:

Don, as much as I'd like to paint the whole thing red and make it look as good as J5Bombardier's machine, I think I'll stick with the black/yellow combination. The red paint was just for the suspension parts, you know, kinda like Porche brake calipers :unsure:.

Try this again... Posting more pics :
1 - Starting reassembly of suspension with seals, cups, and cones;
2 - One side done, looking good, can't wait to see wheels;
3 - Had to machine quite a few parts, this is the spacer behind the wheel;
4 - Ahhhh, just about ready for a wheel;
5 - Same as the suspension, seals, cups, and cones;
6 - Got two of them on! :clap:
 

Attachments

  • IMG00057-20100514-0827.jpg
    IMG00057-20100514-0827.jpg
    75.9 KB · Views: 1,613
  • IMG00058-20100515-1508.jpg
    IMG00058-20100515-1508.jpg
    78.1 KB · Views: 1,618
  • IMG00062-20100518-1037.jpg
    IMG00062-20100518-1037.jpg
    73.3 KB · Views: 1,567
  • IMG00065-20100518-1121.jpg
    IMG00065-20100518-1121.jpg
    93.1 KB · Views: 1,572
  • IMG00067-20100518-1139.jpg
    IMG00067-20100518-1139.jpg
    69.8 KB · Views: 1,570
  • IMG00068-20100518-1204.jpg
    IMG00068-20100518-1204.jpg
    87.7 KB · Views: 1,527

benz9

New member
It is hard work and it's kept me from smoking so far. It's been almost 5 months now. Yesterday I put on the last wheel (front) on that side and repacked the "flower pot" with new cups, cones and seals. I don't know if the J5 had that aluminum cap on the "flower pot" but no one had the double seals that fit in that hole other than Prinoth/Plannord. So instead of paying a lot, slapped the puppies on the lathe and removed about 25/1000 " so the new seals would fit snuggly in. Almost ready for reinstall of the Sprocket assy. But I'm gonna flush the diff first (thanks for the tips Pixie) before I seal those "flower pots back to the hull. I'm also picking up belting next week, found some 3ply 330 for about 3.25$/ft @ 4.5" wide. It will be a nice machine once I'm done.:brows:
 

benz9

New member
J5B, sorry, there was no 4 or 5 ply at the shop, but they had lot's of 2 ply for any Bombi owners in the national capitol region...:brows:
Well the manifold left today for Montreal to get welded. I left it in the hands of my father in-law, a 35+ years millwright who took a very big load off my shoulders because I've looked and shopped and have even been asked if I had some manifolds. They are rare items.
Has anybody had problems finding the strainer/rubber gasket assy for the fuel pump on the 6 inline flathead? All the suppliers I've been to show me a picture of the part (got the p.n. out of the book Chrysler Industial Engines) and it is now a paper cartridge that doesn't fit in the bowl. I've thought about an electric pump and an inline filter, but I'm sure the screen strainer is cheaper??? Any help on this would be appreciated. Will post more pics this week as more parts get installed on the machine. The winch is also in pieces so when I have all the wheels back on and the tracks rebuilt, I'll work on the winch until the manifold comes back from the weld shop. Until then, let's enjoy summer:w00t2:.
 

J5 Bombardier

Well-known member
Benz9 keep your eye out for a manifold off M37 dodge,M43 radio trucks, I used that on mine. The exhaust exits out the bottom,I did a u turn with the pipe and up and out. Could be a little tight on the narrow hull of a sw48,but it's an idea. Fuel pump I went electric with in line fuel filters on both sides of the pump, and a carb off a 250 chev in line 6,single barrel Rochester worked for me, no more govenor,I just keep an eye on the tach 2200 rpm tops.
J5 Bombardier
 

Snowtrac Nome

member formerly known as dds
GOLD Site Supporter
Another option would be to get some proseal and and glue the bowl shut put in a inline fuel filter or just replace the mechanical pump with a new one i would opt th fab up a block off plate remove the old pump and run an electric pump with one filter on the outlet side also only use rubber hose to splice your steel lines. use of rubber lines to replace the steel lines could cause vapor lock as rubber wont remove heat as effectivaly as the steel lines will
 

Snowtrac Nome

member formerly known as dds
GOLD Site Supporter
also with your don't try to push through the fuel pump it will work but if you rupture the diaphram it will fill your crank case full of fuel
 

benz9

New member
J5B and Don, thanks for the advice. We did take the governor plate off yesterday before sending it off to Montreal and there was a nut blocking any movement of the mechanism inside. Didn't Bogie say this was something you really should leave on??? I know that I run mine at about 3000 RPM and so far the head is still on the block. Once we removed the nut, the governor was free to move. Did yours have a key to adjust it? Yeah a real key like for a desk drawer. I guess it's to adjust spring tension.
I will start to shop for an electric pump, since this is a popular choice. BTW Don, my fuel line is completely rubber??? Maybe set up some kinda water retention device, like the glass bowl, but with a purge valve that is accessible...now wouldn't that be smart???
 

Mtn-Track

Member
If it helps, you can get M37 engine parts from Vintage Powerwagons dot com.

I've had issues in the past with electric fuel pumps when it's real cold, so I would suggest getting another mechanical one.
 

Snowtrac Nome

member formerly known as dds
GOLD Site Supporter
If it helps, you can get M37 engine parts from Vintage Powerwagons dot com.

I've had issues in the past with electric fuel pumps when it's real cold, so I would suggest getting another mechanical one.
Im not one to chnge from the way the engineers designed things un les i have to what problems have you had i run my snow trac in some pretty cold weather and have no problems yet some rules one should remember about electric fuel pumps is to mount pumps on the same plane as the fuel tank or below it , moutn the fuel pump in close to the fuel tank and use solid lines with flares on the pressure side both to prevent vapor lock and the chance oi a hose slipping off and blowinf fuel all over the hot engine .i have seen this in the past remember in the late 70s and 80s ford used a rubber hose between the fuel pressure line and fuel filter wich was right next to the distributor on the v8 engines the hose rotted and blew a stream of gas on the ignition system the car pulled into our gas station on fire under the hood took 3 extuinguishers to put it out.
 

benz9

New member
Ah Man, this is getting complicated. I like the mechanical pump, I just can't get the screen for it. It always worked good before until it clogged up. I also have a little experience in the army with the Iltis Jeep and it had an electric fuel pump and even in the summer, a good kick would often get a non-working pump running. I just don't think it's a good place for the pump because when the manifolds are back on, there is almost no room to go empty that bowl of water and $h!t. That's where the 3$ in-line filter comes in...:brows: As for the manifold, I've written to Vintage Power Wagons and they don't have the one for my engine, it's been out of stock for a long time. I've left it in good hands and trust the old man to do a good job on it. I'll try to go up to the shoe factory where he works and snap a couple of pics of his welding!
While waiting for chemical gasket to dry this afternoon, started to work on the winch. I just love the gunk that replaces grease in there when dudes go in the swamp with a SW and don't wash it off after. It's just swamp water and fine sand, eating away at all the steel parts (and alum too). So it's all cleaned up, planetary assy, clutch and all. ready for repacking and paint. At least there are no parts to replace so far.
Got some pics, I'll post later tonite...smell y'all later.
 

Snowtrac Nome

member formerly known as dds
GOLD Site Supporter
I'm have no idea about the itlis pumps in the us military all our equipment used facet fuel pumps never had a problem. the other nice thing about those pumps they had a filter screen and magnet at the bottom to pre filter the fuel
 

benz9

New member
Sorry guys, a day late with the pics...
basically it's just the third wheel installed and then putting new bearings in the "flower pot" and reinstalling the sprocket. It's on the SW so we don't get moisture in the diff. I still have to clean out the water residue in the bottom of that huge enclosure the diff sits in. I can only imagine it must be bigger on a J5 and Muskeg, therefore take even more oil??? Wow. Started to take the track apart today...long process when 1 out of 5 bolt actually unscrews. the others have to be grinded or drilled (I prefer grinding, much faster). Catch y'all later.
 

Attachments

  • IMG00070-20100521-0705.jpg
    IMG00070-20100521-0705.jpg
    77.6 KB · Views: 1,289
  • IMG00073-20100525-1525.jpg
    IMG00073-20100525-1525.jpg
    132.8 KB · Views: 1,288
  • IMG00071-20100521-1346.jpg
    IMG00071-20100521-1346.jpg
    82 KB · Views: 1,308
  • IMG00069-20100521-0704.jpg
    IMG00069-20100521-0704.jpg
    69.6 KB · Views: 1,316

pixie

Well-known member
SUPER Site Supporter
The bolts in my track were 1/2". The ones that wouldn't come apart I just broke :smile: ( About one in five ! )

Differential is the same and usually in about the same size enclosure on SW48, J5 and Muskegs.
Adapt some 3/8 fuel line to a wet/dry vac with duct tape and maybe plumbing fittings and stuff it down the filler hole. Use some copper tubing stuffed in the end of the fuel line so you can move the line around in the bottom of the diff. enclosure. The really nasty stuff doesn't always flow ..... Rinse and repeat !

Edit to add : your vacume will smell funny for a while... don't 'borrow' your wife's :yum:
 

benz9

New member
Pixie, you are by far the coolest gal on this forum! I think you must have seen my type of track, the one with fury slippers that don't damage the city's sidewalks (pic 1). It is very hard to break the bolts because of the rubber all around the bolt. Any one have tricks, they are welcome. I took just under 2h to get 6 grousers completely removed with no bolts in the holes. At 54/track, that's gonna be a long task for the hot summer:unsure:.(pic 2) Going to GBS today to pick up some more bearings, start working on drivers side suspension and wheels... more $$$ :glare:
 

Attachments

  • IMG00074-20100527-0700.jpg
    IMG00074-20100527-0700.jpg
    189.4 KB · Views: 1,285
  • IMG00076-20100527-0702.jpg
    IMG00076-20100527-0702.jpg
    155.4 KB · Views: 1,283

Snowtrac Nome

member formerly known as dds
GOLD Site Supporter
ok partner try this those bolts look to be 5/16 inch center punch and drill through the heads if the heads don't fall right off 1 blow from a chisel should remove itwhen you are done pick up your grousers and go
 

pixie

Well-known member
SUPER Site Supporter
Thanks, Benz :blush:

I didn't remember that you had the furry ones.
My hot tip of the day ........ FIRE :w00t2:


PS It's gonna smell; wear a respirator. Do it at night so the neighbors don't call anyone :wink:

:yum:
 

Snowtrac Nome

member formerly known as dds
GOLD Site Supporter
Ice queen is hotter she likes snow trac's

iI enjoy having all the FF women around they are funny not easyly offended but still ladies when they need to be
 

benz9

New member
Ouch, that is a hot tip and one that I did think of, except here, it's so illegal that they won't even take copper at the recycler if they suspect you burnt the insulator off. Bah, it's pay day and went to get some more parts at the bearing store and was about to assemble one more wheel tonite when I realized that I had to make spacers to fit behind the big washer on the suspension (for some reason, maybe wear, if I don't put a 3/16 spacer behind that washer, I can't get the cones to hug the cups:unsure:). Then, I realized, I have to make the big washers too. Well I cheated a little on those and bought some big ass washers and just trimmed them down a bit and bored them out a little more on the lathe. They fit just fine now. If I was in Nome, then I could keep working tonite, but unfortunatly, it gets dark here around 9pm so I have to give up assembling until tomorow. Don I will try your trick and let you know how it turned out.
 

benz9

New member
Ahhh, it's raining here so I get the night off to post some more pics... Going well actually. Takes me less and less time to install stuff. Experience I guess. Here we go. First pic from Saturday morning, just finished cleaning up the rust and spayed a coat of primer on the hull. After adding two coats of black gloss, had to fix one of the axles, someone had welded it and had left a lot of popcorn. Used an angle grinder to make a good surface for the washer to rest on. Second pic is the tandem bar reinstalled. Had to replace the washers here and the originals had a small hole in them to let the grease out (to show it's full???) so I also make a #40 hole in the washer (you can see the grease coming out on the right of the crown nut). I didn't replace the nuts, although slightly rusted, they are fine. Did replace the cotter pins. 4 new grade 5 bolts for the rear wheel axle. Prepped a wheel for install but without the front wheel swing arm and spring can attached, it would make installing these part difficult with wheels on.
Don, I haven't tried your trick yet, the wife had me do a bunch of house work on Sunday but I plan on taking the drill press outside and trying it.
Here's a question to y'all, there is a machinery shop in Laval that (I'm guessing here) services the SWs for the city of Montreal/Laval and is selling used Camoplast tracks for the SW. Has anybody run these tracks before? Are they heavier than the standard tracks? How much less traction will I get with a used track as opposed to the steel grousers bolted to a new rubber belt? Things to think about...
 

Attachments

  • IMG00078-20100529-0804.jpg
    IMG00078-20100529-0804.jpg
    67 KB · Views: 804
  • IMG00082-20100529-0957.jpg
    IMG00082-20100529-0957.jpg
    119.5 KB · Views: 789

Snowtrac Nome

member formerly known as dds
GOLD Site Supporter
we ran all rubber tracks on the bv 206's worked good on the snow and most other surfaces the only tine they sucked were on ice and in clay type gumbo that little problem could be resolved with cleats made of short pieces of channel iron say 2 inches 1 layed paralell with the grouser and on the next grouser lay it at 90 degrees . i would jump on those tracks alot easyer than re belting the one down side buy lots of molsons and invite a bunch of buddys over too help loop the track on there will be some bad words used.
 

benz9

New member
Don,
called the guy up yesterday after posting the picture and asked him the price for the used belts (new ones go for 1900$ each + tax, so over 4G:w00t2:). He said that he has two types, used and really used, so 1000$ for the first (set of two) and 500$ for the later (set of two).
Here's my question. How would a flat track compare to a track made with steel 2.5" grousers and converyor belting? When I asked him this, I don't think he understood, he started talking about guys that bought his used tracks for skidding wood in the forest and added angle iron to the belts??? Cost wise, it's still cheaper to rebuild original but man, it's a lot of work. I don't like the easy road, but in this case, after taking 6 grousers off the first track, I get discouraged and have to do something else for a while before starting on the next six.:w00t2: So unless (1) I win the lotto, (2) get free tracks or (3) some fall from the sky (not too close to the house I hope) then I'll continue to take my tracks apart all summer and rebuild them in the fall!
 
Benz9,
Tracks seem to be the Achilles Heal to making a snow cat affordable. Once they are worn out they are either a pain to work on or expensive but usually both. However once you rebuild/replace yours they will last a long time with proper care and usage.
I once found a brand new track for a Thiokol Spryte at the local metal recycling yard that still had the tag on it. I paid $50 for it and then stored it for over 10 years as the tracks on my Spryte were in good shape. I tried selling it locally and on places like this forum and finally sold it at an auction for $25. The thing was worth thousands.....to the right person at the right time.
Depending on what you plan on doing with your SW would kind of decide if you need grousers or not. If you are just plowing your driveway or going off road in the summer than the all rubber track would give you a better ride and do less damage to you drive way. Deep snow fresh snow with any kind of hills will require some type of cleat or a winch and shovel.
Oh one more thing, once you invest in new tracks, rebuild the ones you have, or sell your SW, you will find tracks all the time usually for free..guaranteed!
 

benz9

New member
Wow, all I can reply to that last comment is a quote from Homer Simpson --> DOH!:doh:

Thanks for the insight, I do plan on exploring a bit with the SW once the tracks are road worthy (I've never gone far from home with the fear one might let go). I have decided to give my money to a local business and purchase conveyor belting to rebuild my tracks. Mr. DDS, master mechanics and wizard at bolt removal, your trick did work. As long as I punch dead center, pilot hole with a #7 cobalt (get them from the father in-law for free) and then full on with a 3/8" jobbers drill bit, more than half the time, the nut stays stuck on the bit! I managed to get another 6 removed this afternoon in less than 2h. So far, found only 2 broken grousers...ouf. I don't have many spares. What about painting theses things, not the grousers but the back plates and the tire guides? I'd love to do that, get rid of the rust, but will it just wear off with use? N E ways, here are some pics of today's work, notice the track getting shorter?
 

Attachments

  • DSCF2855.jpg
    DSCF2855.jpg
    132.4 KB · Views: 746
  • DSCF2856.jpg
    DSCF2856.jpg
    122.2 KB · Views: 735
  • DSCF2857.jpg
    DSCF2857.jpg
    111.7 KB · Views: 745
  • DSCF2858.jpg
    DSCF2858.jpg
    137.3 KB · Views: 743

e2spear

New member
I remember years ago replacing a bunch of those. Before you go to far, call around to anybody who works for a city garage or parks & rec dept to see if maybe they have some left hanging around. We had purchased two machines from the parks dept and they had spare pieces to rebuild one complete side, 2 spare wheels, lots of bearings, spare tranny and all kinds of stuff.
We also replaced the single seat with one from the back of a Dodge Raider which fit great so we could have somebody travel with you. We modify the sticks to off set from the center so we could get two in the cab.
 
Top