• Please be sure to read the rules and adhere to them. Some banned members have complained that they are not spammers. But they spammed us. Some even tried to redirect our members to other forums. Duh. Be smart. Read the rules and adhere to them and we will all get along just fine. Cheers. :beer: Link to the rules: https://www.forumsforums.com/threads/forum-rules-info.2974/

Kristi KT7 restoration pictures

Melensdad

Jerk in a Hawaiian Shirt & SNOWCAT Moderator
Staff member
GOLD Site Supporter
Gee Al, sorry to hear about your problems. I just got back inside. We had a nice fresh snowfall here that we were not supposed to get. The family decided it would be a nice evening for a drive in the Snow Trac so we packed up the little yappy dog and had a very pleasant drive through the fields.

Too bad about your finger.
 

Ricochet

New member
Ouch! :eek:

I guess you probably ended up with a triple. :drink::drink::drink:

I must admit that was a pretty good summary of your day...funny too. :thumb:
 

DAP

New member
Snowcat Operations said:
This thread reminds me of that movie where the workers had to build 2000 cars in 3 days. Cant remember the name but the cars were missing quite a few essentail parts! ....


Could be your talking about the movie 'Tucker'. In that movie however, it was only 50 cars in 7 days. 49 of em are still with us.

Talk about getting the shaft ...

:applause:
 

BigAl

Gone But Not Forgotten
SUPER Site Supporter
Ok Boys and Girls !
This was the day I have been waiting for ! I removed the remaining track and gear box as well as the frame . On 2/23 /2006 I started tearing this old KT7 apart . Today I finished . 11 days to rip it apart . I’m pretty happy about that . :thumb:
Called the neighbor and told him to come on over and take a look . He asked me if I was still mad ??? :pat: Silly neighbors can’t tell when I am kidding around . Told him to come on over and bring a 6 pack of beer . Also asked him if he had any Rum and Dr. Pepper . :beer:

Had the neighbor help me lift the old fiberglass body outside again and gave it another pressure washing and degreasing .Told him to stick around , have a beer and stop complaining about helping move it out . Told him maybe I would help him lift when we take it back in the shop :whistle: Finger is still pretty sore though .

I now have it back in the shop and started grinding out the cracks , holes and cutting out damaged areas . Going to add another layer of glass across the whole bottom of the body for additional strength and any areas where it has stress cracked .

Did you know that if you grind off red "gel coat" and do not use a mask , you end up with the coolest “Red Boogers” ???


Tomorrow I am headed off to the paint store to pick up fiberglass cloth , resin ,oh ...and a mask and start putting her back together !!!:a1:

Here are a few pictures .
Big “ Red Booger” Al:coolshade


Attachments

  • kristi KT7 032.jpg
    kristi KT7 032.jpg
    96.2 KB · Views: 460
  • kristi KT7 052.jpg
    kristi KT7 052.jpg
    75.9 KB · Views: 460
  • kristi KT7 051.jpg
    kristi KT7 051.jpg
    94.2 KB · Views: 464

Melensdad

Jerk in a Hawaiian Shirt & SNOWCAT Moderator
Staff member
GOLD Site Supporter
Allen, did you realize the amount of work you would have to put into this when you bought it? From prior conversations, I never figured you'd have to totally tear it apart. But I must say, you are sure doing the job right. Have you considered glassing in a piece of plywood on the bottom, or some narrow strips of plywood to help act as impact barriers on the bottom of the unit?
 

BigAl

Gone But Not Forgotten
SUPER Site Supporter
B_Skurka said:
Allen, did you realize the amount of work you would have to put into this when you bought it? From prior conversations, I never figured you'd have to totally tear it apart. But I must say, you are sure doing the job right. Have you considered glassing in a piece of plywood on the bottom, or some narrow strips of plywood to help act as impact barriers on the bottom of the unit?

Hi Bob ,
NO ! I did not think the KT7 had this much abuse , but in defense of the guy I bought it from ,I do not think he knew it also . Until I started tearing into it ,I really thought it was in pretty good shape .The motor runs strong ,but after what I have found ,I do not trust it . Since I am this far it would be crazy not to finish it correctly . Lucky for me ,most of the work is just my labor . I can do everything else but the machine work on the block and heads .

The floor already has a 3/4" lumber core plywood which is glassed on both sides . I just want some extra glass protection on that bottom .
Big Al
 
Last edited:

BigAl

Gone But Not Forgotten
SUPER Site Supporter
Today I headed for the Automotive paint store and picked up my fiberglass cloth ,resin and about $260 bucks of really neat stuff that somehow ended up in my basket for my prep work . I still don’t know how that happens .I told the salemans the type of paint I would eventually need for the body .A custom mixed Base coat/Clear coat mix to match my Ford Truck. He just smiled and rubbed his hands together . Boy! I hate that !

Got started about 2:00 PM . Started glassing in all the holes and cracks . Got about half of the bottom half of the body done .

I used Fiberglass “Kitty Hair” on the small holes and scratches . That stuff works well for that . Sands real nice !

Started scratching myself about two hours ago and have not stopped since ! Boy that stuff is itchy !!!

I am using a structural reinforcing type of Fiberglass cloth to overlay the bottom . This is much stronger than the woven type of cloth . A little harder to work with ,but well worth the effort .

After talking with the “paint tech” about “spray on” bed liners I am just about talked into doing it myself . He said his results were better than the spray on dealers and the finished product would be thicker and cheaper . How about it Bob??? I know you did your own , Was it worth the effort ?


Did you know that Fiberglass Red boogers are really tough ??? You should not let them “set up” too long before digging them out . When the nose hair comes out with it ,that hurts and tears form in your eyes!:cry:

Tomorrow I should get quite a bit done .


Big Al:coolshade


BigAl

Gone But Not Forgotten
SUPER Site Supporter
Two pictures of 4 - 1" cut holes being fiberglassed patched over . These will get two more layers of glassing , applied from the inside of the body .They were for routing the 4 old hydraulic lines that went to the rear of the vehicle for towed implements.

BiG Al
 

Attachments

  • kristi KT7 058.jpg
    kristi KT7 058.jpg
    62.3 KB · Views: 440
  • kristi KT7 059.jpg
    kristi KT7 059.jpg
    56.8 KB · Views: 430

BigAl

Gone But Not Forgotten
SUPER Site Supporter
Well... I spent this morning grading out a friends road so I only got in half a day on the restoration .
Got my order placed for new seats ,marine carpet , interior fabic , insulation , lights ,trim , etc. I spent the remainer of the day sanding , patching , filling and going over the body for any stress cracks or imperfections .

I have four major cracks to "glass in" and reinforce tomorrow on the lower body . Bottom back door area at pintle hook , bottom front door area at eye bolt , from the front light hole to the door and one that runs from the rear track lift arm hole toward the back . At least three of these cracks were cause by operator neglect and added parts that were improperly installed .

Also discovered today that it appears at one time the front drivers side has been damaged and repaired . Looks like who ever repaired it ,did a first class job .
So it looks like a few more days of labor before the "tub" is ready to be primered .


Big Al
 

BigAl

Gone But Not Forgotten
SUPER Site Supporter
I forgot to add in the last post that I discovered what a projected "Sales Price" for a KT7 was going to be when it hit the production line .
I found an article on the web from the monthly minutes of the Board of Commissioners , San Juan County , State of Utah .

There is a "one sentence reference" for approval of sending "The Kristi Company" a 10% deposit of about $1100 for a future KT7 . I assume , this would have been just before the company went out of business . It was dated about 1972 , I believe .

Based on the 10% down price ,that would put the sales price at $11,000.00 for a KT7 in 1972 .

I wonder what it would calculate into "todays dollars" given the "cost of living increases since 1972 ?

Big Al
 

pixie

Well-known member
SUPER Site Supporter
Al, great project you got going. I usually get things all taken apart and get overwhelmed. Anyway, you were asking in another thread about rebuild kits for your motor. I found a place that sells rebuilt motors so parts must be available.

http://www.kcpp.com/remanufactured_engines.htm

Good luck. I can't wait to see the Kristi up and running :D
 

BigAl

Gone But Not Forgotten
SUPER Site Supporter
pixie said:
Al, great project you got going. I usually get things all taken apart and get overwhelmed. Anyway, you were asking in another thread about rebuild kits for your motor. I found a place that sells rebuilt motors so parts must be available.

http://www.kcpp.com/remanufactured_engines.htm

Good luck. I can't wait to see the Kristi up and running :D

Thanks Pixie . I went down yesterday and talked with the local Napa machine shop about my motor . They don't seem to know much about them , even though it is a Ford .

Gave me a figure a $850 just to redo the heads complete . Holy Cow!!!! That seems really high to me . We did not even get around to talking about machining the engine block .

They think that if it has good compression across the pistons and passes a leak down test ,I should just go with it . I just am very relucdant to reinstall that motor without going through it .

Can I get some input and advice from some of you other "Motor Heads" out there on doing this ???


Big Al
 

Melensdad

Jerk in a Hawaiian Shirt & SNOWCAT Moderator
Staff member
GOLD Site Supporter
Silly quesiton, but what about just swapping in a similar size Ford engine that is not an "industrial" version?

I know Snow Trac's have an "industrial" ending in them, but I also know that a regular aircooled VW flat-4 fits perfectly under the hood. If my engine ever dies, I think it would be easier and less expensive to swap it out for a more common engine.
 

mtntopper

Back On Track
SUPER Site Supporter
Just keep up the posting and pics on your KT7 restoration.:a1: I look forward to coming in from the shop after working on our 1500 LMC each day and seeing that someone else actually has more problems to contend with than I do.;) kinda helps me sleep better knowing there are others out there with similiar problems. Of course the Dr. Rums also take some of the pain away. Just had to try it.

Wish I would of documented the snow cat rebuilds like you with all the pics and details.
 

BigAl

Gone But Not Forgotten
SUPER Site Supporter
B_Skurka said:
Silly quesiton, but what about just swapping in a similar size Ford engine that is not an "industrial" version?

I know Snow Trac's have an "industrial" ending in them, but I also know that a regular aircooled VW flat-4 fits perfectly under the hood. If my engine ever dies, I think it would be easier and less expensive to swap it out for a more common engine.

Good question Bob !,
I was talking to a guy the other day ,who knows more than anyone I know about motors . He was telling me that he thought one of the old Mercury "Capri" motors would fit right in . I have not seen a Capri motor and do not know the specs on one .
Worst case senario is I may just do that . It would be nice to keep this KT7 as close to orginal as possible . So far , other than a much better updated interior finish ,sun roof ,Radio's , custom paint and tinted windows the kristi will be mostly stock .
At the rate I am going ,I need to make a decision about this motor SOON!
Big Al
 

Melensdad

Jerk in a Hawaiian Shirt & SNOWCAT Moderator
Staff member
GOLD Site Supporter
mtntopper said:
Wish I would of documented the snow cat rebuilds like you with all the pics and details.

So do we. But there is always next time! :weneedpic

One thing I would like to see is more restoration photos and threads about the 'small stuff' like restoring the headlights, or restoring/repairing the dashboard/gauges/switches, or rewiring the electrical system, or detailed threads about painting, etc.

We often post threads that show the big improvements or 'milestones' we make in our progress, but the devil is in the details. While specific threads about the 'small stuff' probably won't be viewed as often, with as much interest as the general topic restorations, my guess is that a thread that goes into detail will provide a lot of useful information for someone else who really needs it. And really, what is so different about restoring one of our snowcats or restoring an old car or building a hot rod? The process of tearing it down and putting it back together is pretty much the same.
 

BigAl

Gone But Not Forgotten
SUPER Site Supporter
mtntopper said:
Just keep up the posting and pics on your KT7 restoration.:a1: I look forward to coming in from the shop after working on our 1500 LMC each day and seeing that someone else actually has more problems to contend with than I do.;) kinda helps me sleep better knowing there are others out there with similiar problems. Of course the Dr. Rums also take some of the pain away. Just had to try it.

Wish I would of documented the snow cat rebuilds like you with all the pics and details.

Hey ! That is a great idea ! There are a lot more LMC's running around than Kristi's . You should do that on your next project !!!
As for the Dr, Rum , that was a lucky discovery at a low point in my Kristi rebuild life !

Mtntopper , I also gave your name to a guy who is looking for a snowcat to access his mountain cabin in the winter up in the Sierra's .Seems like you had or have a couple for sale . He asked about buying my KT7 .If he takes it any further I will get him in contact with you .
Al
 

mtntopper

Back On Track
SUPER Site Supporter
BigAl said:
They think that if it has good compression across the pistons and passes a leak down test ,I should just go with it . I just am very relucdant to reinstall that motor without going through it .
Big Al

That engine is really well designed and almost bullet proof. Might be better off to not rebuild unless it really needs attention. Do you know how many hours are on the engine? One of the major problems I have seen with this motor are old gasket and seal problems. If everything else checks out good, I would consider just a reseal of the complete engine instead of acomplete rebulid. You may still want to do the valve and head work.

The V4 engine compact design and HP rating makes it an ideal fit in a small and narrow engine compartment area. It would be hard to put any other engine design in many applications where it was used without major fabrication and alteration. You would probably have to change the cooling system with another engine swap also. Then the transmission adaption may also become an issue. I have seen a GM 4 cylinder in an Imp once. They had to extended the front nose end of the Imp to accomodate the cooling system required for this inline 4 cylinder engine and new transmission arrangement.:( :beer:
 

BigAl

Gone But Not Forgotten
SUPER Site Supporter
mtntopper said:
That engine is really well designed and almost bullet proof. Might be better off to not rebuild unless it really needs attention. Do you know how many hours are on the engine? One of the major problems I have seen with this motor are old gasket and seal problems. If everything else checks out good, I would consider just a reseal of the complete engine instead of acomplete rebulid. You may still want to do the valve and head work.

The V4 engine compact design and HP rating makes it an ideal fit in a small and narrow engine compartment area. It would be hard to put any other engine design in many applications where it was used without major fabrication and alteration. You would probably have to change the cooling system with another engine swap also. Then the transmission adaption may also become an issue. I have seen a GM 4 cylinder in an Imp once. They had to extended the front nose end of the Imp to accomodate the cooling system required for this inline 4 cylinder engine and new transmission arrangement.:( :beer:

Thanks Mtntopper ,that helps !

If you have a cooling problem in the future ,let me know . I also owned a Radiator Shop before I retired .

We did a ton of "extreme custom designed radiators ".Half the custom rigs running around here have my radiators in them . I even had one in the "Oakland Roadster Show" Grand Champion winner .

I can usually solve just about any cooling problem. With so many radiator core designs avalible there is no reason why anyone should have too put up with a cooling problem . It all breaks down to cubic inches of core, tank size , and air flow .
Big Al
 

BigAl

Gone But Not Forgotten
SUPER Site Supporter
Evening Guys & Gals:tiphat: ,

Today I really got after looking for engine parts . I made quite a few discoveries with the help of the old internet . Below is a list of Ford parts used on other Ford motors that will fit a Ford V4 104 Cu. In. motor :

Fuel Pump , Distributor cap and general tune up parts etc . Ask for parts for a 1971 Ford Pinto or Bobact 2000 CC OHC motor .

Pistons , Bearings, oil pump , valves and other internal parts should be the same as a Mercury Capri 159 cu.in. V6 - 2600 CC motor .

TRW also makes a Aluminum Camshaft gear that will replace the "Bakelite" one that is stock . The replacement Camshaft gear is , according to the information I found ,to be 100% better .

The 104 Cu . Inch Ford V4 were also used in Saab 96 and Saab Sonnets of the late 1960's early 1970's.

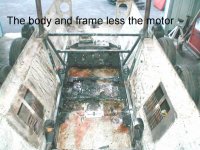
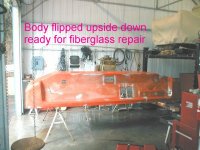
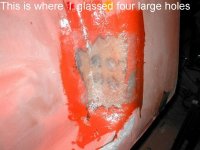
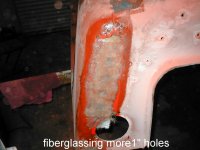
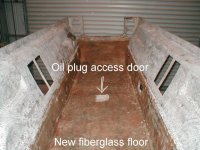
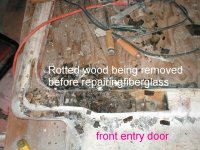
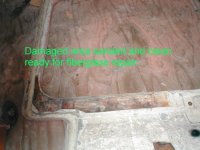
Today I glassed up the 4 major cracks in the body and started preparing the interior floor for another layer of fiberglass .
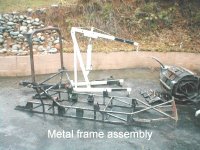
I had intended to lay the fiberglass layer over the outside of the body floor , but after thinking about it decided to install it on the inside . I have already ground out and glassed in any damaged areas to the outside floor area and it is basically done and ready for the Bed Liner spray. Putting the fiberglass on the inside will give me a good suface for reinstalling the metal frame assembly . I can also extend the glass up the insides of the body,gain additional structural strength and when the new interior is installed ,it will never be noticed . A hell of a lot less work too!!

In repairing the cracks and damage in the fiberglass, I first cut or ground out the damaged area . Rough up the surrounding area with 80 grit sandpaper on a disc sander . I did this on the inside of the body panel too . I also drilled a small 1/4" hole at the ends of any cracks to stop them from traveling any further .

I then used a reinforcing type fiberglass cloth for any areas that needed structural strength . I started on the outside and applied a heavy coat of resin with a small cheap 2" (throw away) paint brush .On larger areas I use a "short nap" paint roller . I then applied my precut and fitted piece of cloth to the damaged area allowing it to overlap as needed and applied another heavy coat of resin ,bedding and brushing the cloth until all air bubbles were removed .I may need more than one layer to build up to the thickness of the orginal surroundind area . Apply only one layer a day . That's it ! Let it dry overnite and then repeat the procedure on the opposite side . If I am repairing a larger area and the cloth wants to sag in the hole or crack , I sometimes will tape a piece of cardbooard on the back side to keep it straight . I just leave it, and lightly grind it off before starting on the "back side fiberglassing" on the next day .

After The fiberglass has dried and hardened ,I use a Air sander with 40 to 80 grit sandpaper to take out any humps or bumps . I finish with a very light coat of Fiberglass "Kitty Hair filler" and sand until I have the desired results .Use a "sanding block" and not just your hand when sanding ! I cannot stress this enough if you want a good looking "finished repair" . I graduate up to 320 grit paper then primer/seal, sand with 400 grit and paint .
This may not be the way the body shops get it done ,but it has always worked for me with good results .

Tomorrow the inside floor gets glassed in . I'll take some pictures of that so you can see the finished result .

:tiphat: Big Al
 

BigAl

Gone But Not Forgotten
SUPER Site Supporter
Well.....

The fiberglass work is done ! I just finished laying a new layer of reinforcing fiberglass on the floor . I may never stop itching!

One thing I did not mention in yesterdays post is to wear long sleeve clothing when working with fiberglass . Also goggles , gloves and a hat . That fiberglass can get everywhere when you are grinding or sanding it . Hang on a minute.... I got a itch !

Ok thats better , now where was I ???? Oh yea ... fiberglass .

All that is left to do on the lower body is a little clean up on the new floor and a little finish sanding on the exterior .

I will wait to shoot the two part epoxy sealer/primer on the exteroir as I only have 24 hour window to apply the Base coat /Clear coat when I do it . Since I still have the upper body parts to repair, the repaired lower half will get hauled outside until all the body pieces are ready . I have included two pictures . The first is the new fiberglass floor . The second photo is the type of fiberglass I used for reinforcing the floor . As you can see the fibers go in every direction which makes it much stronger than the woven type for reinforcing .

One last note ,is a trick I learned from the Indians in Panama for fixing worm holes in wooden boats . Take straight resin with hardener and add Talc to it . Yes, the same type of talc "Bogus Bob" uses on his butt . Keep adding talc until you get a putty type consistency ! This makes the best filler for holes I have ever used !

Ok, since I don't drink , its time for me to go take my "Dr.Rum rheumatism medicine" .

HONEY!!! Make it a Double!!!

:coolshade Big Al
 

Attachments

  • fiberglassing 001.jpg
    fiberglassing 001.jpg
    81 KB · Views: 406
  • fiberglassing 003.jpg
    fiberglassing 003.jpg
    86.3 KB · Views: 401

Melensdad

Jerk in a Hawaiian Shirt & SNOWCAT Moderator
Staff member
GOLD Site Supporter
Why talc?

Also, have you tried wearing a disposable Tyvec jumpsuit when fiberglassing? I've used them when spraying 2 part epoxy; Tyvec is modestly cheap, and would be ideal for fiberglass work too.
 

BigAl

Gone But Not Forgotten
SUPER Site Supporter
B_Skurka said:
Why talc?

Also, have you tried wearing a disposable Tyvec jumpsuit when fiberglassing? I've used them when spraying 2 part epoxy; Tyvec is modestly cheap, and would be ideal for fiberglass work too.

Actually a tyvek suit would work very well .

As far as using talc . It does not change the fomula , works excellent and is very cheap .

The Indians in Panama will also take styrofoam and add a little gas . As you know it will desolve the styrofoam ,but did you know it makes an excellect glue??? They use it for repairing cracks in their dug out canoes .
Al
 

BigAl

Gone But Not Forgotten
SUPER Site Supporter
quote=BigAl](" The Indians in Panama will also take styrofoam and add a little gas . As you know it will desolve the styrofoam ,but did you know it makes an excellect glue??? They use it for repairing cracks in their dug out canoes " end quote ) Forgot to mention that they use only enough gas to set the styrofoam chunks on fire . They use a old discarded soup can to melt the styrofoam down . Once it completely melts from the fire they then pour it striaght from the can into the crack on their boat . Once it cools ,it is hard as a rock . Allen
 

BigAl

Gone But Not Forgotten
SUPER Site Supporter
Today ,I started by hauling the lower body outside to store and started on the repairs to the front entry door to the KT7 . I started by removing the wiper motor and window . Once I had all the hardware off and the old weatherstripping dug out ,I was able to see the extent of damage . I knew I had some major cracks ,but once I started grinding ,I realized that the plywood core had rotted away in one whole corner of the door ,where the window is secured . I cut out the fiberglass cover from the inside and with a small chisel ,starting digging out all rotten wood . Tomorrow I will stop by the lumber yard and pick up a can of expanding foam .I intend to use it to fill the plywood void before fiberglassing . I hope that the resin does not react with the foam . I plan on testing some first . If this fails , I will cut new plywood pieces and bed with resin to fill in the rotted section and overlay a new section of fiberglass cloth . I had planned on showing pictures of the door ,but my attachment is not working ???? Bob S did you do this to get even ??? Big Al
 

Melensdad

Jerk in a Hawaiian Shirt & SNOWCAT Moderator
Staff member
GOLD Site Supporter
BigAl said:
I had planned on showing pictures of the door ,but my attachment is not working ???? Bob S did you do this to get even ??? Big Al
Nope. Blame Doc, he upgraded the site! Actually I had some problems with uploading photos earlier, but then it started working fine for me. Maybe its just you. But right now the SMILIES are not working. . . they were working earlier. Hhmmmmm?
 

BigAl

Gone But Not Forgotten
SUPER Site Supporter
Wow!
I finally got my attachments working again .

You guys have to remember that my computer is so old it has a choke knob and a hand crank ! I am not even up to having "dial up" where I live !!!

I tried everything I could think of to get it working again . I even spun it around and looked in the back of the "monitor/coup combo" . That is where the "homing pigeons" live and fly the messages back and forth . I did find one dead bird and I think that may have been the problem . The other pigeons did not want to cut in front of him, in the line , so nobody did anything !!!They are Union Birds !!!

Anyway ,I cleaned out the dead pigeon ,fed the pigeons and got everybody lined back up . I signed in and I guess it fixed itself and the birds are happy again ! Last thing I want is a pissed off union pigeon ...


So here are the pictures of the damaged door
Big Al
 

Attachments

  • fiberglassing door 001.jpg
    fiberglassing door 001.jpg
    98.4 KB · Views: 376
  • fiberglassing door 003.jpg
    fiberglassing door 003.jpg
    78 KB · Views: 369

Melensdad

Jerk in a Hawaiian Shirt & SNOWCAT Moderator
Staff member
GOLD Site Supporter
Are you going to glass in some new wood? Honestly I'm totally clueless on fiberglass repair. Never done it. Talked to a bunch of people about it, but never had the need to do it. So I'm just sort of a clueless idiot but it strikes me that you'll need to reinforce that corner somehow.
 
Top